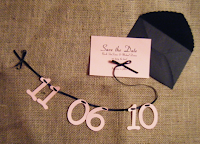
(My inspiration--however, since the wedding colors are white and ivory, this was not quite the right look. I wanted a little bit more delicate, a little less Victoria's Secret. I also couldn't quite figure out how to get the ribbon through the numbers like that without ripping them apart.)
Thankfully, I had a Cricut (a personal cutting machine) at my disposal.
(The Cricut included the "Base Camp" cartridge.)
Supplies were pretty inexpensive. All in all, I spent about $25 to make them and then an additional $15 for stamps to mail many of them out.
I started by getting the Cricut to cut out all the numbers; I then glued the numbers to the (changed to white) ribbon. To keep it looking sleek, I also glued the white paper flowers to cover the point where the ribbon/numbers were glued. I did the gluing on a plastic sheet to so that I could easily peel off the numbers/ribbon after the glue was dry without ending up with a mess on my hands.
(My finance was happy to get the dining room table back after I finished all this.)
After all the numbers/ribbon were glued, I tied a bow on both ends of the ribbon and glued one end to a small card I created on my computer and printed out onto the textured card stock.
Finally, I had the cricut cut small envelopes for me, that I was able to fold together to fit my perfect sized save-the-dates. Because they were just regular card stock, I sealed them with Martha Stewart's textured white lace hearts.
And with that they were ready to be mailed--sort of. They were too small to be mailed directly like this, so I was able to load small envelopes that meet the 3.5 x 5 requirements of the USPS into my printer and had mail merge print everyone's address. These were placed inside those regulation-sized envelopes and mailed out!
Reactions were great. My family loved them. Most guys laughed, but I'm sure their wives could appreciate them!


